Lettering Spring
Letter Drawing and Design – Layered Technique
Spring is in the air! What a great time to work on some spring lettering or lettering some spring.
We’ll walk through a lettering spring tutorial focusing on letter drawing and letter design with a layered lettering technique.
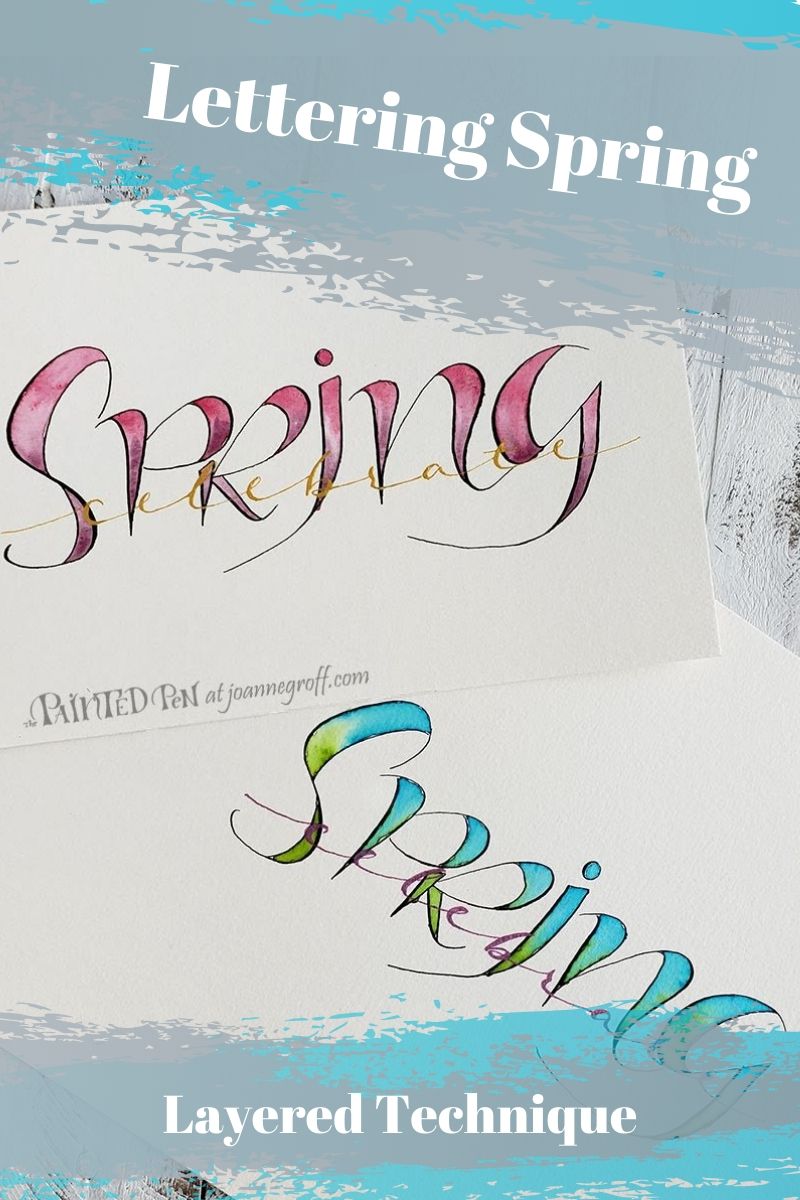
Sometimes lettering looks like calligraphy, sometimes it looks like painting, and sometimes it looks like drawing. Today, we’ll draw the word spring and layer celebrate in script on top of it to celebrate the coming of spring.
Supplies
I want you to pick your supplies for this project, but if you’re curious, here are the supplies I used.
- Canson Watercolor paper
- Sumi ink
- Noodler’s Navajo Turquoise Ink (sample sizes available)
- De Atramentis Mahatma Gandhi Ink (sample sizes available)
- Sakura Gelly Roll Pen, metallic pink
- Calligraphy nib and pen holder
- Watercolor brush of choice
- Water and a paper towel
Let’s get started.
Letter Drawing
I love drawing letters. It takes longer than straight up calligraphy or hand lettering. But for me, it allows a different kind of expression to infiltrate the words. For that reason, when I draw letters, I like to incorporate meaning into the letter design.
First, I think about what shape I want to give my letters. When I think of spring, I think of life and growth in abundance filled with bright color. I imagine all of the people and creatures stepping out from their winter hiding places to romp and run in the warmer air.
Something about spring feels playful. So I want the letters I draw to be playful and bright too.
What comes to mind when you think of spring? How can you add these things to your letters?
Start with the letter S
Try some different styles to see which one feels right for you.

When you’re happy with how the S looks, try to note the different parts of the it that you like. You will want to mimic these style elements in the other letters of spring.
I want to fill my spring letters with color later, so I drew a playful block style letter S. To make a block style letter, just thicken the down strokes by adding a second line.

Keep your letter style consistent as your draw the rest of the word spring.

If you want more style ideas for the letter S, you can find many different styles in my alphabet style study, S and Seasonal Scenery.
I often draw my design on a separate piece of paper then use a light box to transfer the design to my watercolor paper. This helps me get a feel for the design and spacing of the letters before I draw them on the final paper.
Trace over your pencil lines using your calligraphy pen and ink. Remember to use a variety of thick and thin strokes to add visual appeal.

Add Some Color
When the ink is dry and you’ve erased any pencil lines, use the wet on wet watercolor technique to add color to your letter drawing.
In the video below, I’ll show you how to add green and blue ink to your letters to create a bright blend, almost like grass and sky.
Before you paint, add a touch of Mahatma Gandhi ink to some of your Navajo Turquoise Ink, so you have a puddle of green ink and a puddle of turquoise ink to work with. Make sure you test each ink to see if it’s the color you want. You will need to add a lot of water to thin the color concentration.
I sped up the video because it’s a repeated process for each letter.
Letter Design – Layered Technique
Lightly sketch the word celebrate across spring. Try to space it to travel over the whole word.
I used a light box to make sure my lettering was centered and spaced well. When drawing a design, I sometimes have to draw and erase several times. Using a light box helps me keep the final draft cleaner.
Trace over celebrate with a metallic pink gelly roll pen. Then use faux calligraphy to thicken the downstrokes of the letters. (Learn more about Faux Calligraphy in this post.)
Let it dry completely before you gently erasing the pencil lines. I have had many a smear because I erased too early.
Now you can try other color blends to celebrate spring!

Happy Creating!

Did you know I’m also on Pinterest and Instagram? Follow me to see a portfolio of ongoing projects and ideas!
Joanne Groff
Just a brainy creative with a fascination about how people think and understand. I use watercolor and letter design to encourage connection ... with self, the environment, and especially the people who live there.
