Rose Drawing with a Watercolor Background
How to Draw a Rose for Valentine’s Day.
This week, we celebrate that special someone in our lives with hearts and chocolate and flowers.
Some people love Valentine’s Day, and some people love to hate Valentine’s Day. Personally, I’ll take any day that involves a fun time with my family, good food and makes someone feel special. At our house, we celebrate our family on Valentine’s Day.
I like things pretty simple and usually say that flowers are nicer outside and growing rather than in a vase wilting (unless they’re free from my garden, of course). I’m more of a special heart-felt (but completely true) message kind of girl. Though a good salted caramel dipped in dark chocolate never hurt anybody! So maybe a heart-felt message with a salted caramel … just one.
Today’s tutorial mixes the two together (minus the salted caramel), a rose drawing to which you can add your own special message. This rose will not wilt (unless you dip it in water, of course).
Now, roses are not my first choice for flowers, but they do represent Valentine’s Day. And I can definitely crush a little on yellow, pink or coral rosebuds.
Let’s draw a rose that will leave an impression that lasts through the whole year and for years to come.
What you need:
- The Basics : water, paper towel, watercolor paper, pencil, masking tape
- Brush of choice, I used a Winsor & Newton Cotman size 10 round brush
- Paint, color of choice, I used Winsor & Newton artist grade permanent rose (but I add a little yellow to make it more coral or a little red to make it more red. Do what you like.)
- Calligraphy penholder, nib, and ink
Are you ready? Let’s get started.
When I draw or design, I always start with research and sketching. If you are happy to follow my design, just move on to the next steps, but if you want your rose to look a little differently, you might want to do a little research and gather some reference photos.
For this rosebud drawing, I started with several different rose sketches. This step also helps your muscles warm up to the movements required for drawing. When you draw something over and over, you create a connection between the movement and your brain. Each drawing becomes more accurate to what you have pictured mentally.

For extra muscle memory, trace over your sketches with ink.
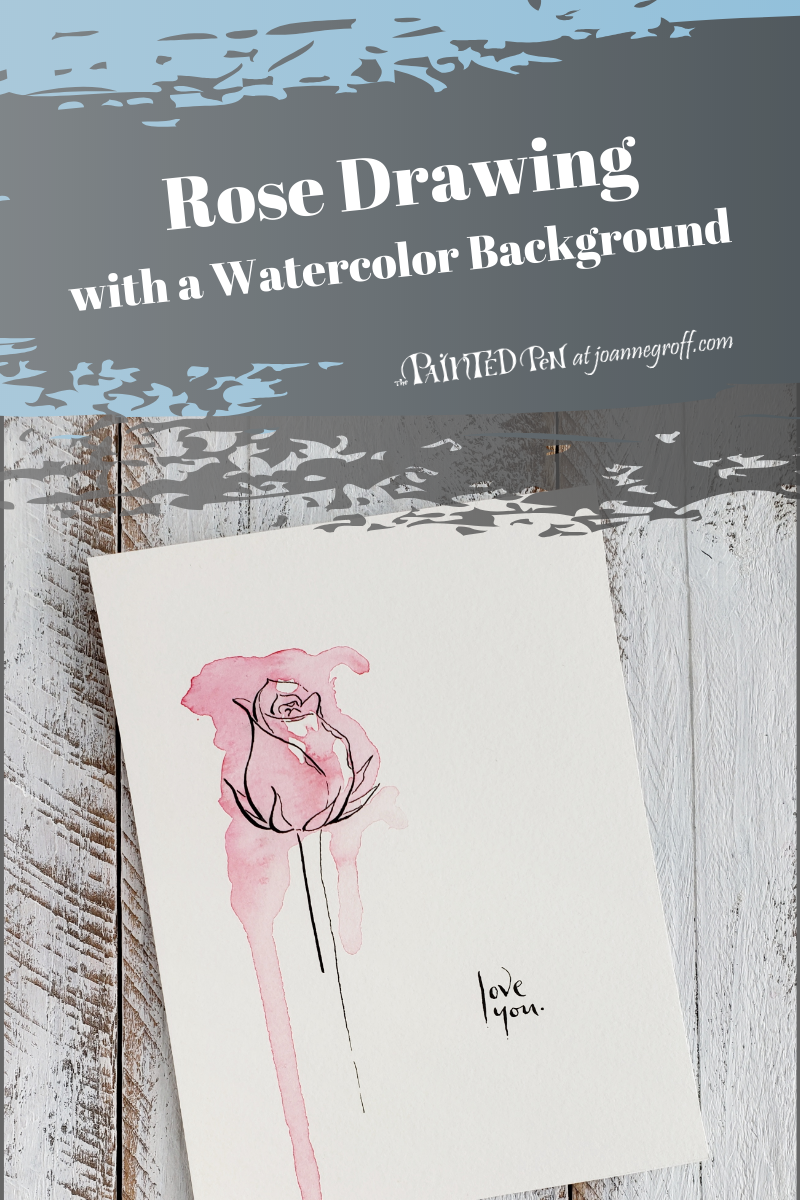
Choose the rose drawing you want to draw. Sketch it on your watercolor paper. Here is a breakdown of the steps to draw the rosebud I used.
(If you’re interested in more rose drawings, this Rose Drawings Workbook shows you how to draw all five of these roses, layer them with several different watercolor backgrounds, and much more. It’s available as a PDF Download or a paperback workbook with The Painted Pen Products.)

I transferred my rose to watercolor paper with a lightbox because I’d already sketched it several times for this tutorial. This step is a time-saver, especially if you are making multiple drawings of the same rose, but a lightbox is not necessary for this tutorial.

When you finish sketching your rosebud in pencil, go over the pencil in ink with your calligraphy pen. Remember to vary the line thickness to add visual appeal. I like to use thick strokes for areas where I want a little bit of shadow.

When the ink is completely dry, erase the pencil lines.
Time for color!
I love to use sumi drawing ink for my illustrations, but the ink needs to dry for several hours before you can paint over it (when you watch my video clip, you’ll see that I sometimes try to hurry the drying process. If your ink mixes with the water a little, just dab that area with a paper towel. Most times, it will lift the ink off the paper enough that it won’t ruin the finished rose. I demonstrate this near the end of the clip.)
For this drawing, I used a dripping watercolor technique. (If you want to try other watercolor techniques, check out this blog post)
First, add a layer of plain water to your rose drawing.
Then, dab your chosen color into the water. Help it spread through the water using your brush.
Finally, tilt your page to allow the access water to run down the page. You can tap it gently if it needs a little help to drip.
Finishing Touch
This rose drawing can certainly stand alone, but if you want to add a calligraphy message, now is the time. I chose “love you” for Valentine’s Day. Sweet. Simple. Period.

I really like the results, and I hope you do too. Now, go love on that special someone. Don’t wait for Valentine’s Day.
And … Happy Creating!

Joanne Groff
Just a brainy creative with a fascination about how people think and understand. I use watercolor and letter design to encourage connection ... with self, the environment, and especially the people who live there.

